What is Peroxide Whitening Skulls
Whitening skulls with peroxide is a popular method for achieving a pristine, clean appearance for skeletal remains. This process involves using hydrogen peroxide, a common chemical compound, to bleach the bone and remove discoloration caused by various factors. These factors include environmental exposure, burial conditions, or the natural aging process. Peroxide is a readily available and relatively inexpensive solution, making it a preferred choice for both hobbyists and professionals. The process requires careful handling and adherence to safety guidelines, but the results can be impressive, transforming dull or stained skulls into specimens that are visually appealing and well-preserved.
How Peroxide Works
Hydrogen peroxide works by oxidizing the organic compounds within the bone. The active ingredient, hydrogen peroxide, breaks down into water and oxygen. The oxygen released then reacts with the organic matter, such as proteins and lipids, which cause discoloration and staining. This oxidation process breaks down these compounds, effectively bleaching the bone and removing stains. The effectiveness of this process depends on several factors, including the concentration of the peroxide solution, the duration of exposure, and the condition of the skull. It’s important to note that while peroxide whitens, it does not strengthen the bone. Proper handling is important to avoid damage.
The Science Behind Whitening

The science behind whitening skulls involves understanding the composition of bone and the chemical reactions of hydrogen peroxide. Bone is primarily composed of calcium phosphate, which provides its structural integrity, and collagen, an organic protein that gives it flexibility. Discoloration occurs when external elements such as dirt, minerals, and organic matter, interact with the bone matrix. Hydrogen peroxide, being an oxidizing agent, causes the discoloration by breaking down the organic compounds that cause staining. The process doesn’t fundamentally alter the bone’s structure, but it can remove the impurities that create unsightly stains. The effectiveness of the whitening process is also influenced by the concentration of the peroxide and exposure time.
Safety Precautions
Safety is paramount when working with hydrogen peroxide. Always wear appropriate personal protective equipment (PPE), including gloves, eye protection, and a mask. Hydrogen peroxide can cause skin and eye irritation, so it’s crucial to avoid direct contact. Work in a well-ventilated area to prevent the inhalation of fumes. If you spill peroxide, immediately rinse the affected area with plenty of water. When using higher concentrations of peroxide, consider using a fume hood or working outdoors. Always store peroxide in a cool, dark place, away from direct sunlight and heat. Keep it out of reach of children and pets. Following these precautions will help make this a safe experience.
Required Materials
Gathering the right materials is essential for successful skull whitening. You will need hydrogen peroxide; the concentration you choose will affect the process (see below). You’ll also need gloves, safety glasses or goggles, and a mask or respirator. A non-metallic container is necessary to hold the peroxide solution, as metal can react with the peroxide. Soft brushes or cotton swabs will be useful for applying the peroxide. Distilled water is recommended for rinsing. Make sure you have a well-ventilated area for the procedure. Finally, have a clean, dry place to set the skull for drying. By having these materials ready, you’ll avoid any disruptions during the process.
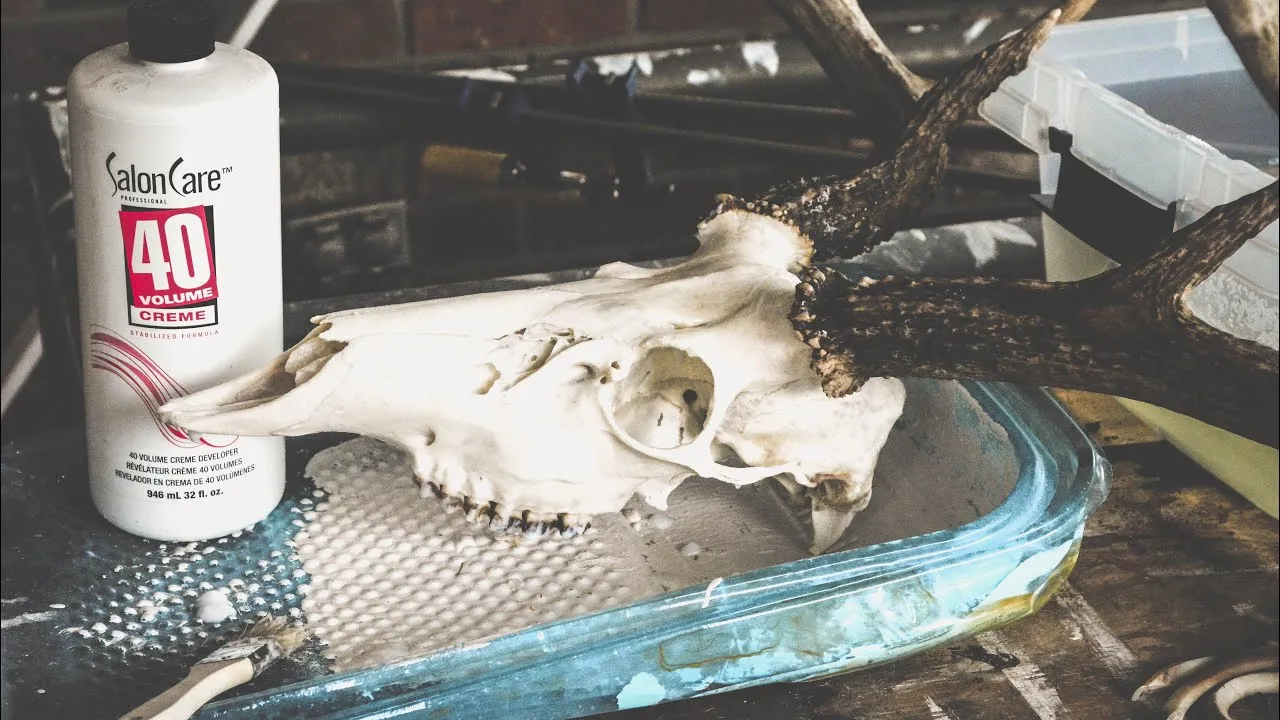
Types of Peroxide

Hydrogen peroxide is available in various concentrations. For skull whitening, the most common concentrations are 3% (household grade) and higher concentrations, like 12%, 20% or even 40% (often used in beauty salons or industrial settings). 3% peroxide is readily available and relatively safe to handle, but may require multiple applications and longer exposure times. Higher concentrations provide faster results but pose increased safety risks and can potentially damage the bone if misused. Be cautious when working with higher concentrations and always follow safety guidelines. It is crucial to select the appropriate concentration based on your experience and desired outcome. Start with a lower concentration and gradually increase if necessary.
Step-by-Step Whitening Process
Preparation
Before starting the whitening process, thoroughly clean the skull. Remove any loose dirt, debris, or organic matter using a soft brush and lukewarm water. If the skull has any dried organic material, consider carefully scraping it away. Ensure the skull is completely dry before applying peroxide. This helps the peroxide penetrate the bone effectively. Protect your work area by covering it with a drop cloth or newspaper. Gather all necessary materials and place them within easy reach. Preparing your workspace and the skull ensures a smooth and effective whitening process, helping you achieve the best results.
Application of Peroxide

Once the skull is prepared, apply the hydrogen peroxide solution evenly over the surface. Use a soft brush or cotton swab to ensure complete coverage, paying close attention to areas with discoloration. Avoid creating pools of peroxide, which can cause uneven whitening. Allow the peroxide to sit on the skull for the recommended time, typically 10-30 minutes for lower concentrations, but be mindful of the concentration you are using. Monitor the process closely to avoid over-whitening. For stubborn stains, consider applying a second coat after the first one dries. Careful and controlled application is key to achieving an even, attractive result.
Waiting Time
The waiting time is a crucial part of the whitening process. The duration depends on the concentration of hydrogen peroxide and the degree of staining. For a 3% solution, you might need to let it sit for 20-30 minutes, while higher concentrations may require less time, around 10-20 minutes. Regularly check the skull during the waiting period to avoid over-whitening. Over-whitening can damage the bone. In some cases, you might need multiple applications to achieve the desired result. Patience and careful monitoring are key to achieving a beautiful and well-preserved skull.
Rinsing and Drying
After the peroxide has done its work, thoroughly rinse the skull with clean water. Ensure all traces of peroxide are removed to prevent continued bleaching or damage. Use distilled water to avoid introducing minerals that could stain the bone. Gently pat the skull dry with a clean cloth. Avoid harsh rubbing, as the bone can be delicate. Allow the skull to air dry completely in a well-ventilated area away from direct sunlight. The drying process can take several hours or even a day or two, depending on the humidity and air circulation. Make sure that the skull is completely dry before storing or displaying it.
Top 5 Tips for Effective Whitening

Tip 1 Proper Preparation
Thorough preparation is fundamental for effective skull whitening. Clean the skull meticulously to remove any surface dirt, debris, or organic matter. A clean surface ensures that the hydrogen peroxide can effectively penetrate the bone. Use a soft brush, and lukewarm water. Make sure the skull is completely dry before applying the peroxide. Proper preparation optimizes the whitening process and helps you achieve the best results.
Tip 2 Concentration of Peroxide
Carefully choose the hydrogen peroxide concentration you intend to use. Lower concentrations (3%) are safer and gentler but may require more applications and longer exposure times. Higher concentrations (12% or more) can provide faster results but carry greater risks, including bone damage. Start with a lower concentration if you are new to the process, and gradually increase it, if needed. Always prioritize safety and carefully monitor the whitening process. Understanding the impact of various concentrations is critical for safe and successful skull whitening.
Tip 3 Sunlight or UV Exposure

Some people find that exposing the skull to sunlight or UV light can enhance the whitening process. The UV rays can accelerate the oxidation of the organic compounds in the bone, leading to a brighter result. However, prolonged exposure to direct sunlight can also degrade the bone. If you choose to use this method, limit the exposure to a few hours and monitor the process closely. Be aware of the potential risks and adjust the exposure time accordingly. It is crucial to balance the benefits of UV exposure with the need to protect the skull from damage. Be cautious when implementing this tip.
Tip 4 Multiple Applications
Sometimes, one application of hydrogen peroxide may not be enough to achieve the desired level of whiteness, especially when dealing with heavily stained skulls. In such cases, multiple applications might be necessary. After the first application, rinse and dry the skull, and then assess the results. If the staining persists, you can repeat the process, applying the peroxide again, allowing it to sit for the recommended time, and then rinsing and drying. Ensure the bone is completely dry between each application. Multiple applications, if performed safely and with proper precautions, can enhance the whitening effect and give you the result you seek.
Tip 5 Protect the Skull
Protect the skull throughout the whitening process and after. Handle the skull with care to avoid any damage. Once whitened, you can apply a sealant or preservative to protect the bone from environmental factors and staining. This coating will help to maintain the beautiful white appearance of the skull for a longer time. Proper storage is also vital. Keep the skull in a place away from direct sunlight, moisture, and extreme temperatures. By practicing careful handling, and storage, you can preserve your beautiful skull for years to come.
Aftercare and Maintenance

Once you’ve whitened the skull, proper aftercare is essential. Avoid exposing the skull to direct sunlight, which can cause discoloration over time. Store the skull in a dry, cool environment to prevent damage from moisture and temperature fluctuations. Consider applying a sealant or preservative to protect the bone surface and prevent future staining. Regularly inspect the skull for any signs of damage or discoloration. By following these aftercare tips, you can preserve the whiteness and beauty of your skull.
Storage and Preservation
Proper storage is critical for preserving the whitened skull. Store the skull in a cool, dry, and dark place away from sunlight, which can cause discoloration. Use a container or display case to protect it from dust and physical damage. Avoid placing the skull in areas with extreme temperature or humidity, as these can affect its condition. If you intend to display the skull, use gloves when handling it to avoid transferring oils from your skin. Regular inspection and gentle cleaning with a soft cloth will help preserve the appearance. Implementing these storage practices will ensure that your whitened skull remains a stunning display piece for many years to come.