Understanding Teeth Whitening in Lightroom
Lightroom is a powerful photo editing software that provides a range of tools to enhance your images, and one of its most popular applications is teeth whitening. This guide provides a step-by-step approach to achieving a brighter, more appealing smile using Lightroom’s features. Whether you’re a beginner or an experienced photographer, these techniques will help you refine your images and achieve professional-looking results. The key to successful teeth whitening in Lightroom lies in understanding the tools and applying them strategically to create a natural and polished look.
Why Lightroom for Teeth Whitening
Lightroom’s non-destructive editing workflow makes it ideal for teeth whitening. This means you can experiment with adjustments without altering the original image. Its intuitive interface, powerful tools, and precise control over details ensure excellent results. Lightroom offers a balance of user-friendliness and advanced features, making it accessible to a wide range of users. The ability to edit photos quickly and efficiently, while maintaining image quality, positions Lightroom as a top choice for photographers and photo editors looking to improve the appearance of teeth in their images. With practice, you can achieve consistently natural-looking results.
Benefits of Using Lightroom

Lightroom’s advantages extend beyond teeth whitening. It offers comprehensive photo editing capabilities including color correction, exposure adjustments, and noise reduction. The ability to organize and manage large photo libraries streamlines your workflow. Lightroom’s flexibility allows you to edit individual photos or apply presets to multiple images at once. This efficiency saves time and ensures consistency across your photo sets. Furthermore, Lightroom’s integration with other Adobe Creative Cloud applications allows for a seamless workflow, making it a versatile tool for all your photo editing needs.
Preparing Your Photo for Whitening
Before beginning the whitening process, ensure your photo is properly prepared. Proper preparation is essential for successful teeth whitening in Lightroom. Start by checking your image’s overall exposure, contrast, and white balance. These adjustments will ensure the teeth appear naturally white and do not clash with the rest of the image. This preliminary stage often involves basic adjustments to the image’s exposure, contrast, and white balance, which set the foundation for your teeth whitening efforts. Properly preparing your photo will result in more natural and aesthetically pleasing final outcomes.
Basic Lightroom Adjustments
In the Develop module, adjust the basic settings such as exposure, contrast, highlights, shadows, whites, and blacks to improve the overall image quality. Small adjustments here can make a significant impact on the final look of the image and the effectiveness of your teeth whitening. Ensuring that the overall image is well-exposed and balanced is crucial for enhancing the impact of your adjustments. Using these basic adjustments to optimize your image provides a solid foundation for precise, detailed teeth whitening. These basic steps are fundamental for any photo editing process.
Cropping and Perspective Correction

Crop the image to remove distracting elements and adjust the perspective to improve the composition. Cropping allows you to focus the viewer’s attention on the subject, improving the overall image composition. If the perspective is distorted, use Lightroom’s Transform panel to straighten vertical or horizontal lines. Ensuring a well-framed and visually balanced image enhances the effectiveness of your teeth whitening efforts. Proper cropping and perspective correction are also crucial for creating a polished and professional appearance for your photos.
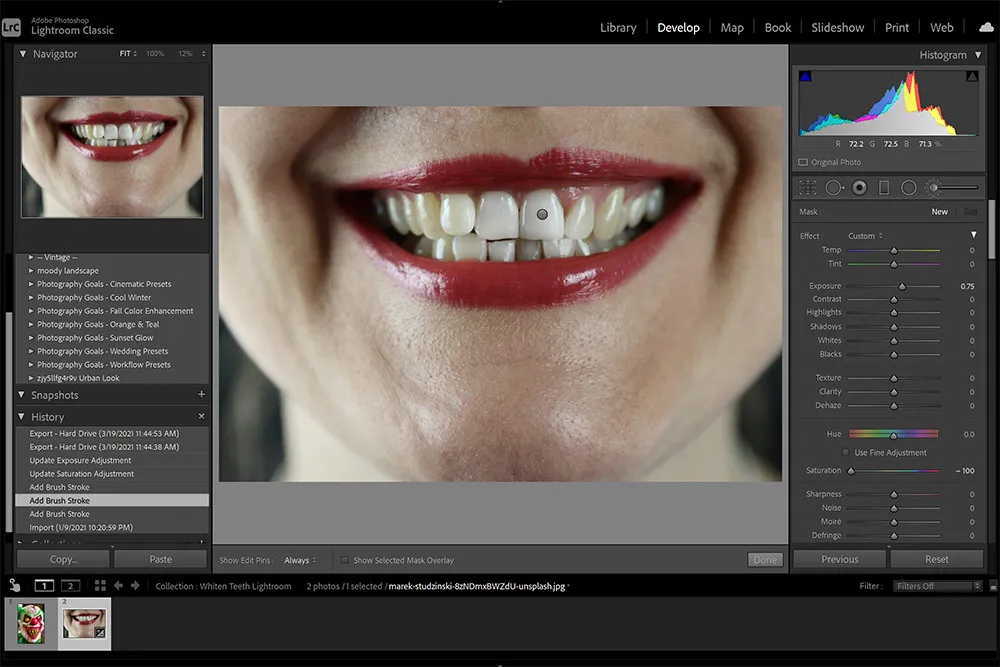
Using the Adjustment Brush for Whitening
The Adjustment Brush tool is your primary instrument for whitening teeth. This tool allows you to make precise, localized adjustments to specific areas of your photo. With the Adjustment Brush, you can carefully apply whitening effects without impacting other areas of the image. It is a versatile tool for achieving natural-looking results. Use this feature for detailed, controlled editing, ensuring that the adjustments enhance the image without looking artificial. The Adjustment Brush offers detailed control, allowing for custom adjustments that align with the unique characteristics of each image.
Selecting the Teeth
Zoom in on the teeth and use the Adjustment Brush to carefully select the areas you want to whiten. Adjust the brush size and feathering to match the contours of the teeth, ensuring a natural transition. A precise selection process is critical for ensuring that only the teeth are affected. The feathering option softens the edges of the brush, creating a seamless blending of the whitening effect with the surrounding areas. Taking your time during this step is crucial for achieving a natural appearance and avoiding any artificial-looking results.
Applying Whitening Adjustments

After selecting the teeth, adjust the Exposure, Highlights, and Whites sliders to gradually whiten the teeth. Start with subtle adjustments to avoid over-whitening. Adjust the temperature and tint to fine-tune the color, aiming for a natural, bright appearance. It’s essential to make incremental changes. A delicate touch helps prevent an artificial look, ensuring the result appears organic. The Temperature and Tint settings help fine-tune the color of the teeth, ensuring they blend seamlessly with the rest of the image. These adjustments will bring out a natural, brilliant smile.
Fine-Tuning and Refining
After applying the whitening adjustments, fine-tune the results by adjusting the Clarity and Texture sliders to enhance the details of the teeth. Use the brush to correct any unevenness. Zoom in and examine the results closely. The goal is to achieve a realistic and polished outcome that complements the natural appearance of the teeth. Fine-tuning is key to ensuring the results are both natural and visually appealing. This step includes fixing any spots where the whitening might have unevenly spread and smoothing out any imperfections.
Using the Radial Filter for Whitening
The Radial Filter can be used to create a subtle whitening effect, or to target specific areas of the teeth. The Radial Filter can be applied to highlight specific areas, such as the front teeth, creating a focused, natural whitening effect. The Radial Filter is a valuable tool for concentrating adjustments, and producing a sophisticated appearance. This helps to create a more dynamic effect, ensuring the result appears natural and aesthetically pleasing. This method is great for ensuring that the whitening effect blends seamlessly with the rest of the image.
Targeting Specific Areas

Use the Radial Filter to selectively adjust the brightness or saturation of certain sections of the teeth. This is useful for addressing uneven tones or localized discoloration. By targeting specific areas, you can refine the whitening process, leading to a more polished outcome. This level of precision allows for subtle enhancements. This targeted approach helps in balancing the white tones and achieving a balanced, attractive smile.
Blending and Feathering
Adjust the Feather setting on the Radial Filter to blend the whitening effect seamlessly into the surrounding areas. A higher feather value will create a smoother transition. Proper blending is critical to avoid any noticeable edges or artificial effects. The feathering ensures a natural, integrated look, making the teeth appear brighter without looking unnatural. These adjustments ensure that the whitening appears smooth, blending the edited teeth with the existing image seamlessly.
Advanced Techniques
For more advanced results, consider using a combination of adjustment tools and local adjustments. These advanced techniques enable you to produce a professional-grade finish. Combine the tools to produce a sophisticated, refined result. Combining these techniques will greatly enhance the appearance of your images.
Color and Tone Adjustments

Use the HSL (Hue, Saturation, Luminance) panel to adjust the color and tone of the teeth. Reduce the saturation of yellow tones to whiten teeth. Adjust the luminance to control the brightness. The HSL panel is critical for precise color modifications. These settings will ensure your teeth are as bright and natural as possible. Fine-tuning these colors is essential for ensuring the teeth appear realistic and harmonious within the image.
Removing Stains and Discoloration
The Spot Removal tool is useful for removing stubborn stains and discolorations. Use this tool to carefully remove any blemishes, creating a flawless appearance. The Spot Removal tool is ideal for meticulous cleaning. Careful use of this tool will help to further enhance your teeth whitening process. Removing stains is an important element in creating the perfect smile.
Saving and Exporting Your Photo
Once you’re satisfied with the results, it’s time to save and export your image. Ensure your settings are optimized for quality and intended use. Properly saving and exporting your images is vital for maintaining the quality of your edits. Carefully exporting your photos ensures your hard work pays off.
Exporting Settings

In the Export settings, choose the appropriate file format (JPEG, TIFF, etc.) and adjust the quality settings. Select the desired resolution and sharpening settings to achieve the best balance of quality and file size. Correct exporting settings will guarantee your images are ready for viewing. Selecting proper export settings ensures the quality and visual impact of your work.
Best Practices for Teeth Whitening
To achieve natural-looking results, use subtle adjustments and avoid over-whitening. Regularly assess the image from a distance to ensure the adjustments look natural. Practice and experimentation are essential to perfecting the technique. By adhering to these practices, you can consistently achieve impressive, natural-looking teeth whitening results in Lightroom. Refine your skills and create great images!